Lightrance Wifi LED Installation Guide
NEVER TURN ON THE LIGHTS WHILE ROLLED UP. THEY WILL OVERHEAT AND BREAK

STEP 1: PRE-PLANNING YOUR SET UP
- Be sure to measure the length of the area you want to set the lights on
- We recommend having LED lights go vertically up your wall, but if you prefer to start the line horizontal from the top of your wall.
STEP 2: PREPARING A CLEAN SURFACE
- Properly use a rag or paper towel to clean off any dirt or dust in the area you’ll be applying your LED lights onto. Doing this is absolutely necessary so the adhesive can stick & hold on strongly.
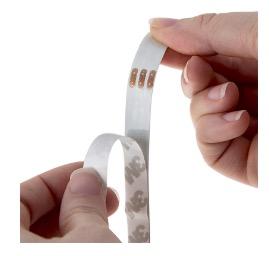
STEP 3: REVEALING THE ADHESIVE
- Gently peel back the plastic on the back of the LED strip to reveal the adhesive.
- Only peel only about 2 inches ahead to make sure the rest of the LED strip doesn’t catch debris, dust or dirt while applying.
STEP 4: PROPER INSTALLATION
- Start off by applying the beginning of the strip against the wall gently.
- Try staying as close to the corner where the wall and ceiling meet to make sure the lights stay in a straight line when applying them horizontally or vertically.
- Ask a friend or family member to hold the other end of the lights and peel the plastic a bit at a time from the adhesive to help make this process easier.
STEP 5: CONNECT
- Connect the Wifi- Controller and the 12V DC Adapter. Both have arrows at the connection point at each end. See picture below

STEP 6: POWER ON YOUR LIGHTS
- The lights will blink different shades when you connect and turn them on.
- Download “Magic Home Pro” App on your mobile device (Android/ iOS).
- Open the App and add devices to the Wifi Network
- Open the phone settings, connect with WiFi “LEDnetXXXX”
- Thats it. Your lights should be up and working!
In case you are not clear with installing lights with the Magic Home app, please follow the below instruction video to connect via Magic Home or Google Home